

This is not a new mod to the Subie world but I decided to apply it to the new models.
Basically 02 WRX's didn't have this installed and it was thought it was damaging transmissions so in 2003 Subaru started installing a valve to keep the clutch from dropping so quick when you do a clutch drop. At first this was an add on part but in 2006, It became integrated inside the clutch slave cylinder.
The problem is this part causes inconsistent pedal feel. And with upgraded clutches, especially puck and twin disk clutches, the engagement is much rougher then it should be because the driver cannot control the clutch very well. This mod will significantly reduce chatter in 6 pucks and other aggressive clutches. This mod may cause damage to the transmission if you drop the clutch so it is a mod at your own risk thing but pretty much necessary if you have a lot of chatter with your upgraded clutch. And the smoother engagement will possibly extend the life of your tranny on a rough clutch. Even Exedy recommended this mod for it's more aggressive clutches.
Mod time about 40 minutes including bleeding the clutch slave cylinder by yourself. Faster with a friend.
Tools needed
14mm Socket with extension
24mm wrench or Socket.
8mm wrench to bleed the slave cylinder
clear vinyl tubing 3/16" inside diameter for bleeding the slave cylinder
brake fluid
Optional tools needed to remove TMIC if applicable aftermarket TMIC may require different sizes.
12mm socket
10mm socket
8mm nut driver, socket, or flathead screwdriver for worm clamp.
1. Remove the TMIC. with most FMIC the clutch slave cylinder is accessible without removing piping.
2. Remove The Banjo bolt running from the Clutch master cylinder to the slave cylinder with the 14mm socket. There are washers on both sides of the banjo bolt, don't loose these. I lifted the line out away and above the master cylinder to keep fluid from leaking.
![Image]()
3. If able to access this break free the 24mm bolt on the slave cylinder toward the front of the car. You can do this after it's removed but its pretty tough and you may need a vise to hold the slave cylinder to break this nut free, it's easier if it's still bolted to the transmission. The 24mm bolt is on the left side of this picture.
![Image]()
4. Remove the clutch slave cylinder by removing the 2 14 bolts on each side of the cylinder. As shown in this picture.
![Image]()
5. Remove the 24mm bolt from the back side of the slave cylinder.
![Image]()
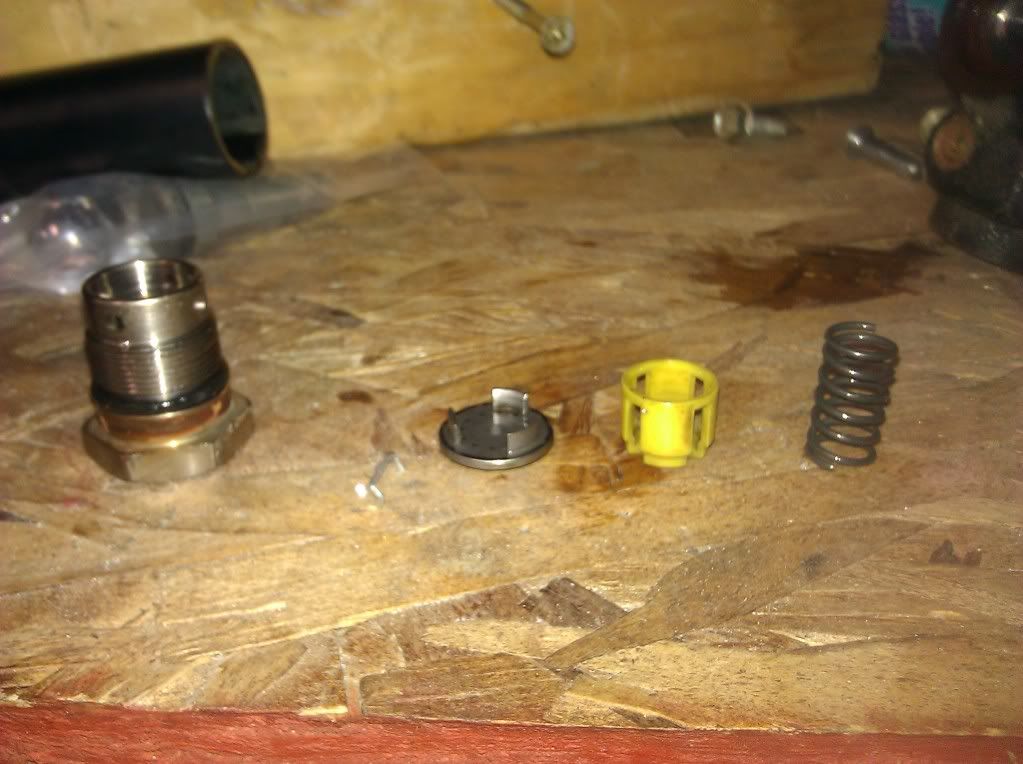
6. With this bolt removed you can now see the 3 parts of the clutch delay valve. A metal orifice plate, a plastic plunger and a spring. They are arranged in this order inside the slave cylinder.
![Image]()
7. Now time to put everything back together. During reassembly. You will not use the 3 parts of the clutch delay valve. Only the 24mm bolt and the o ring. So you will not need the 3 parts to the right of this picture.
![Image]()
8. With the oring in place. Tighten the 24 mm bolt into the slave cylinder.
9. Install the slave cylinder, reverse as removal. Tighten the 14mm bolts down to the transmission. Also tighten down the banjo bolt to the slave cylinder.
10. Now time to bleed the system. A full fluid change can be done at this time and it only requires about a cup of fluid.
10-1 Remove the clutch master cylinder cap and top off with fluid.
10-2 Install the clear vinyl tubing over the bleed screw and run the tubing to a bottle to catch the excess fluid.
10-3 With the 8mm wrench open the bleed screw to bleed off the pressure.
10-4 Push the clutch pedal to the floor, it will stay on the floor.
10-5 Tighten the bleed screw.
10-6 Lift the clutch pedal to the top off the stroke
10-7. Repeat steps 10-3 through 10-6 till there are no air bubbles coming out of the bleed screw. While going through this process keep an eye on your clutch master cylinder to be sure that fluid doesn't drop below the minimum line in the slave cylinder or new air bubbles could be introduced. This will go quicker with a friend but unlike bleeding brakes can be done by a single person, it will just take about 15-20 minutes to completely change out all the fluid. With a friend, probably 5 minutes.
11. Now enjoy your new clutch, and more consistant engagement and less chatter.
I did this mod on a stock clutch and didn't feel much difference if any, but my buddy who has been living with really bad chatter from his ACT 6 puck sprung clutch for a year and half has noticed a huge improvement in drivability and much reduced chatter. In his words, 1000 times better. I hope this helps some of you out there.
Basically 02 WRX's didn't have this installed and it was thought it was damaging transmissions so in 2003 Subaru started installing a valve to keep the clutch from dropping so quick when you do a clutch drop. At first this was an add on part but in 2006, It became integrated inside the clutch slave cylinder.
The problem is this part causes inconsistent pedal feel. And with upgraded clutches, especially puck and twin disk clutches, the engagement is much rougher then it should be because the driver cannot control the clutch very well. This mod will significantly reduce chatter in 6 pucks and other aggressive clutches. This mod may cause damage to the transmission if you drop the clutch so it is a mod at your own risk thing but pretty much necessary if you have a lot of chatter with your upgraded clutch. And the smoother engagement will possibly extend the life of your tranny on a rough clutch. Even Exedy recommended this mod for it's more aggressive clutches.
Mod time about 40 minutes including bleeding the clutch slave cylinder by yourself. Faster with a friend.
Tools needed
14mm Socket with extension
24mm wrench or Socket.
8mm wrench to bleed the slave cylinder
clear vinyl tubing 3/16" inside diameter for bleeding the slave cylinder
brake fluid
Optional tools needed to remove TMIC if applicable aftermarket TMIC may require different sizes.
12mm socket
10mm socket
8mm nut driver, socket, or flathead screwdriver for worm clamp.
1. Remove the TMIC. with most FMIC the clutch slave cylinder is accessible without removing piping.
2. Remove The Banjo bolt running from the Clutch master cylinder to the slave cylinder with the 14mm socket. There are washers on both sides of the banjo bolt, don't loose these. I lifted the line out away and above the master cylinder to keep fluid from leaking.
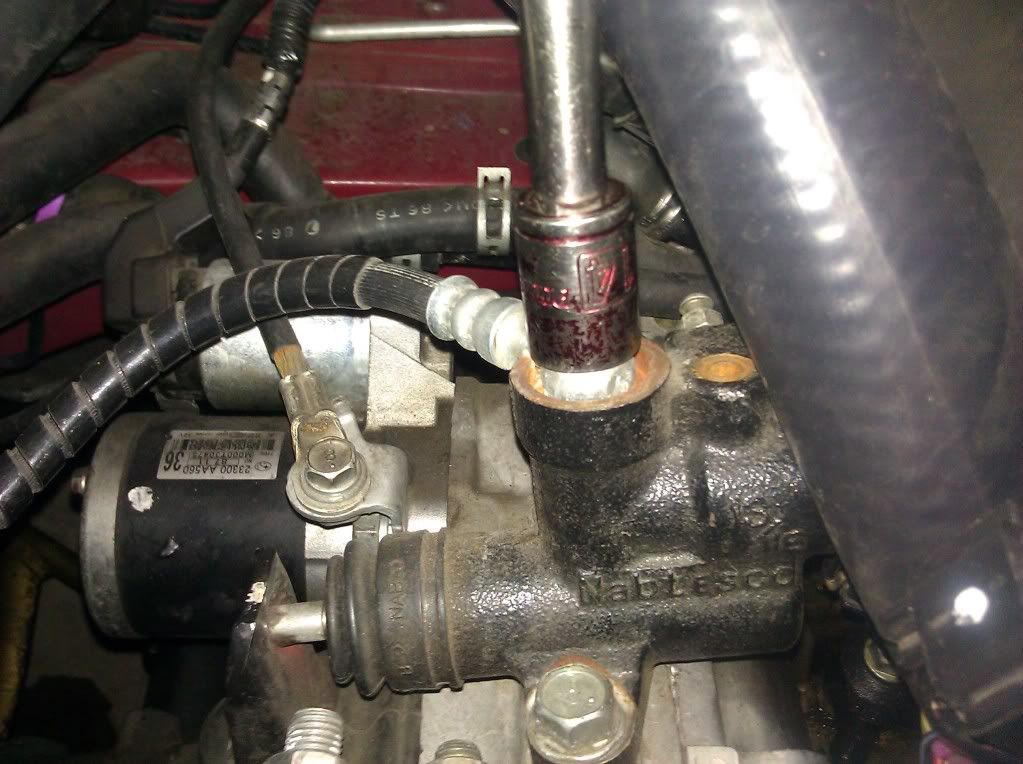
3. If able to access this break free the 24mm bolt on the slave cylinder toward the front of the car. You can do this after it's removed but its pretty tough and you may need a vise to hold the slave cylinder to break this nut free, it's easier if it's still bolted to the transmission. The 24mm bolt is on the left side of this picture.
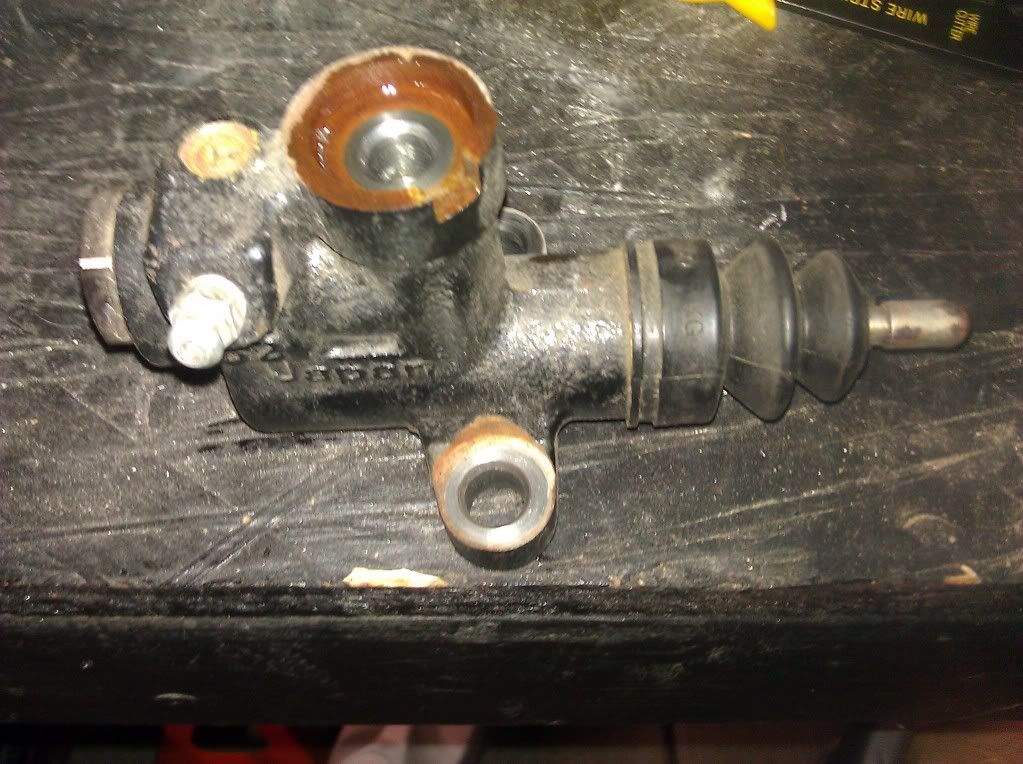
4. Remove the clutch slave cylinder by removing the 2 14 bolts on each side of the cylinder. As shown in this picture.
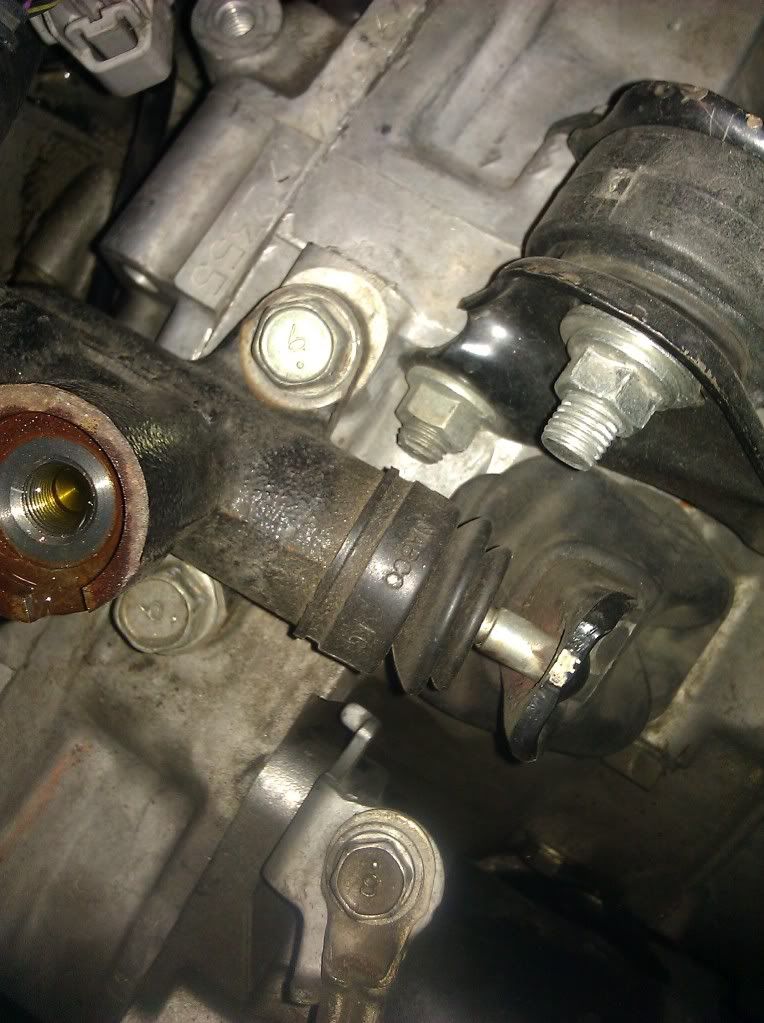
5. Remove the 24mm bolt from the back side of the slave cylinder.
6. With this bolt removed you can now see the 3 parts of the clutch delay valve. A metal orifice plate, a plastic plunger and a spring. They are arranged in this order inside the slave cylinder.

7. Now time to put everything back together. During reassembly. You will not use the 3 parts of the clutch delay valve. Only the 24mm bolt and the o ring. So you will not need the 3 parts to the right of this picture.
8. With the oring in place. Tighten the 24 mm bolt into the slave cylinder.
9. Install the slave cylinder, reverse as removal. Tighten the 14mm bolts down to the transmission. Also tighten down the banjo bolt to the slave cylinder.
10. Now time to bleed the system. A full fluid change can be done at this time and it only requires about a cup of fluid.
10-1 Remove the clutch master cylinder cap and top off with fluid.
10-2 Install the clear vinyl tubing over the bleed screw and run the tubing to a bottle to catch the excess fluid.
10-3 With the 8mm wrench open the bleed screw to bleed off the pressure.
10-4 Push the clutch pedal to the floor, it will stay on the floor.
10-5 Tighten the bleed screw.
10-6 Lift the clutch pedal to the top off the stroke
10-7. Repeat steps 10-3 through 10-6 till there are no air bubbles coming out of the bleed screw. While going through this process keep an eye on your clutch master cylinder to be sure that fluid doesn't drop below the minimum line in the slave cylinder or new air bubbles could be introduced. This will go quicker with a friend but unlike bleeding brakes can be done by a single person, it will just take about 15-20 minutes to completely change out all the fluid. With a friend, probably 5 minutes.
11. Now enjoy your new clutch, and more consistant engagement and less chatter.
I did this mod on a stock clutch and didn't feel much difference if any, but my buddy who has been living with really bad chatter from his ACT 6 puck sprung clutch for a year and half has noticed a huge improvement in drivability and much reduced chatter. In his words, 1000 times better. I hope this helps some of you out there.


